

I. Introduction
- The importance of efficient event registration management
Efficient event registration management is crucial for the success of any event, whether it's a small workshop, a large conference, a charity fundraiser, or a corporate gathering.
A user-friendly registration process can encourage more people to register and participate. It enhances the attendee experience, facilitates financial and capacity planning, and provides valuable data for improving future events.
Proper registration management also helps organizers comply with legal and regulatory requirements, ensuring that records are kept for future reference or audits.
- Overview of HubSpot Workflows Integrated with Accelevents
Managing event attendees efficiently can be a complex task, especially if you're using multiple tools for different aspects of your marketing efforts. This is where the power of HubSpot workflows comes into play.
HubSpot workflows simplify your event management processes and enhance your overall marketing strategy by seamlessly importing contacts into Accelevents. Manually transferring this data is time-consuming and prone to errors, so automating the process with HubSpot workflows is essential.
- Purpose of the blog: Exploring how to import event registrations from HubSpot using HubSpot Workflows
The purpose of this blog is to discuss in detail the process of importing event registrations seamlessly from HubSpot to Accelevents, using Workflows. We aim to guide event organizers, marketers, and businesses through the steps and strategies required to efficiently import event registrations, making the most of HubSpot's automation features.
Whether you're planning a conference, webinar, or any event that relies on attendee information, this blog will serve as your comprehensive resource for simplifying the registration management process and maximizing the potential of your event campaigns.
II. Understanding HubSpot Workflows
In the world of event management, every detail matters. From planning and promotion to registration and follow-up, managing events can be a complex and time-consuming endeavor. Fortunately, HubSpot offers a powerful automation tool called “Workflows” that can greatly simplify the process of organizing and executing successful events. It’s a tool that you will utilize if you have Accelevents integrated with HubSpot with the goal of importing contacts to Accelevents.
Imagine a HubSpot workflow as your dedicated assistant. As an event organizer, you can give it instructions like registering contacts from a specific HubSpot list to an event. You can even specify what type of ticket they should receive and if you want to send them an automated email after they are registered. As long as you give clear instructions, it will meticulously adhere to your directives to manage the task!
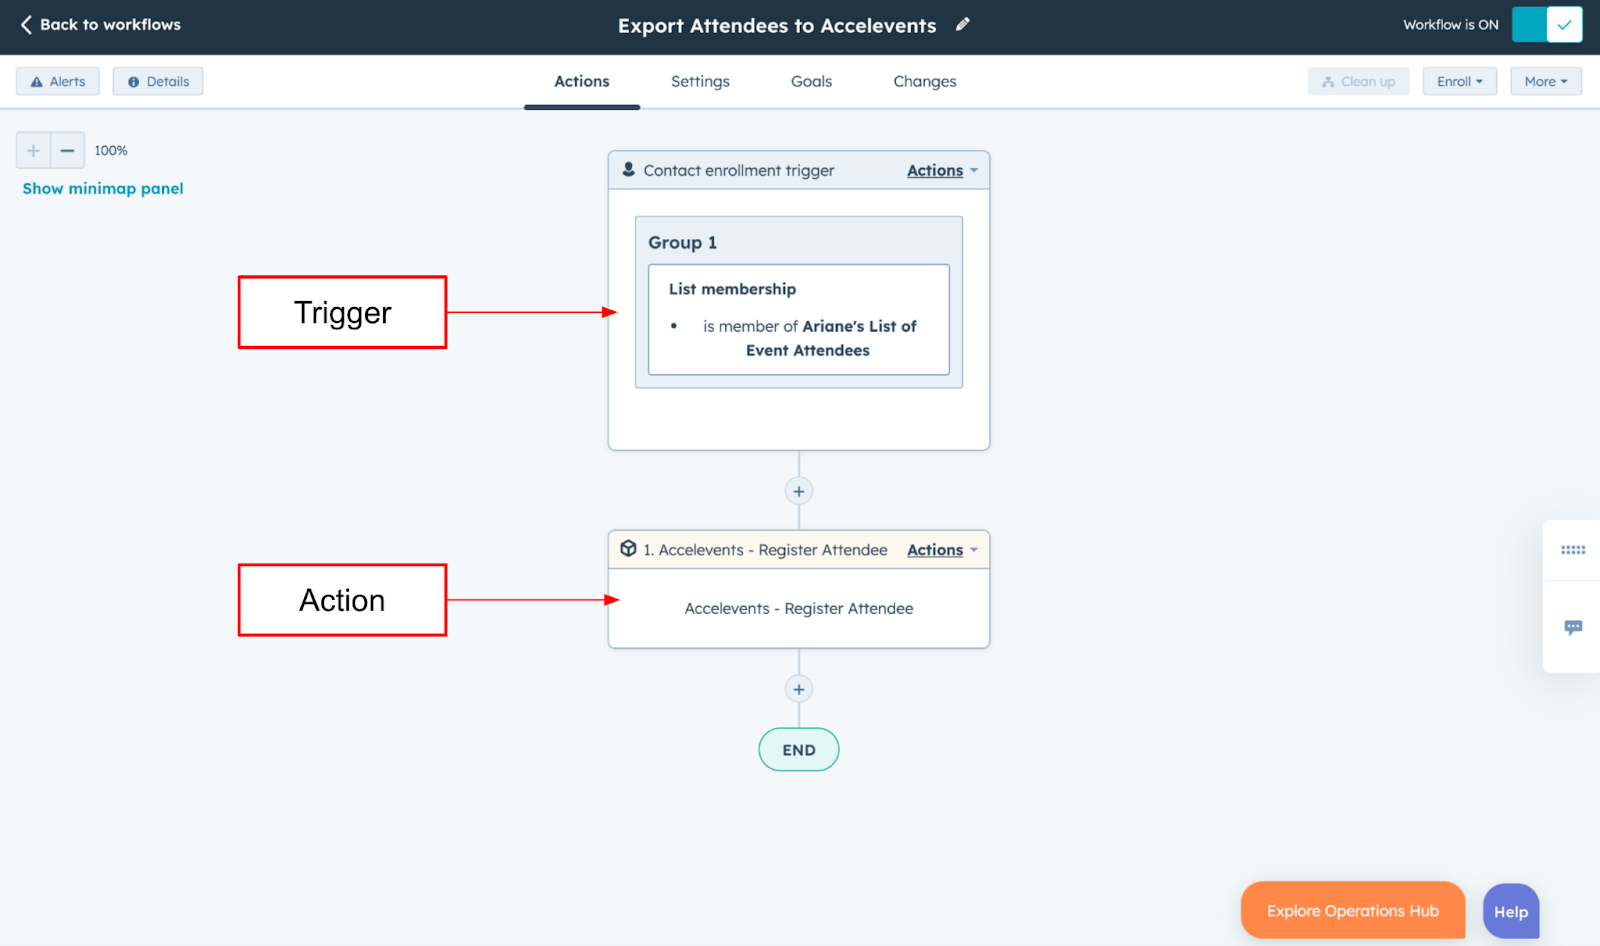
A workflow has two essential components: a trigger and an action. If your goal is to register attendees to the event, this is the action or task you want HubSpot to perform in your workflow. In the example above, we wanted to register contacts from a specific HubSpot list - this is your trigger. If any contact is added to the HubSpot list, the workflow will automatically register that contact to the event.
What’s excellent about workflows is that they are fully customizable, so if you have other conditions, you can create filters that will define exactly what will be included in the trigger and action.
In essence, HubSpot workflows can automate the registration process, send confirmations and personalized messages, and help you stay organized as you manage your event. It simplifies the process and ensures that your attendees have a smooth and engaging experience from the moment they register until they attend your event.
III. Key Benefits of Using Workflows for Event Registration Management
- Automation: HubSpot workflows automate the data transfer process, ensuring that contact information is consistently and accurately synchronized between the two platforms. Whether you’re importing contacts from a list, form submissions, or both, you can expect that contacts will be imported as attendees in real-time
- Time Efficiency: Imagine downloading a list of contacts, adjusting the file data to fit the registration requirements, uploading the file to Accelevents, and doing the same steps every time you have a new batch of attendees to import. It will take most of your day just to compile that list. With workflows in place, your team can save valuable time that can be redirected toward other critical tasks.
- Data Consistency: With workflows, you can define which data will be included in the import, and since everything is pre-defined, you can expect that the same behavior will apply to all attendees added to Accelevents.
- Error Reduction: Automation reduces the risk of human errors associated with manual data entry. With fewer errors, both event staff and attendees can benefit. If all the correct data is included in the attendee’s registration, it’s more likely that they won’t have any issues joining the event and sessions. Your staff can relax knowing that everything is running smoothly.
- Customization: You can create workflows tailored to your specific event requirements, ensuring that the right data is transferred at the right time. HubSpot has numerous ways of how to trigger an import. Aside from just importing attendees, you can also automatically register attendees to sessions with the right kind of triggers.
- Segmentation: Workflows enable you to segment attendees based on various criteria, such as registration date, interests, or ticket type. This segmentation allows for targeted communication and tailored experiences. Attendees are more likely to engage with communications relevant to their needs and preferences. This targeted approach increases the likelihood of your desired actions, such as returning for the next event or turning them from leads to actual customers.
- Real-Time Updates: As an event organizer, you can receive instant notifications whenever someone registers for their event. This allows for timely responses, such as sending welcome messages or confirming registrations. Real-time data can help you gauge attendee engagement during the event, such as track which sessions or activities are most popular, allowing your team to make on-the-fly adjustments to accommodate attendee interests.
IV. Core Characteristics of Exporting Data from HubSpot to Accelevents
In the preceding section of this article, we delved into the concepts of triggers and actions. Beyond the primary function of exporting HubSpot contact data to register attendees for the event, the Accelevents integration extends its capabilities to execute additional actions through HubSpot workflows once the registration is complete.
- Event Registration and Attendee Information Mapping
At a minimum, the exported contact information should include the attendee name and email address. However, with the right workflow action, you can also incorporate additional details such as the company name or dietary preferences. Aside from mapping these fields in the workflow, ensure that these are also mapped in the event’s HubSpot mapping configuration.
There are two critical pieces of Accelevents information that must be specified within the workflow to register contacts as attendees: the event to which these contacts should be registered and the type of ticket they should receive. Once the workflow is published, any contact enrolled in the workflow will automatically be added as an event attendee.
- Session Bookmarking
The success of this data transfer hinges on the contact's registration for the event. Consider a scenario where you maintain a VIP list, and you want to guarantee them a seat for all event activities. Rather than requiring them to reserve seats individually or manually managing this process, the Accelevents integration streamlines it into a single operation. You can even incorporate an action into your workflow that automatically sends them an email, assuring them of their reserved spot for the session.
- Session Check-In
Going a step beyond, attendees can be seamlessly and automatically checked into sessions, provided they already possess an event ticket. This automated check-in process minimizes the necessity for event personnel to oversee check-in desks, freeing up their time and attention to concentrate on other critical aspects of event management. The result is not only potential cost savings but also a more streamlined and efficient allocation of resources.
V. Best Practices for Creating HubSpot Workflows to Export Event Data
- Define the Objectives - Clearly defining your objectives helps you establish a specific goal for your workflow. They help you determine the necessary steps, criteria, and actions. You can tailor your workflow to capture and export only the relevant contact data, preventing unnecessary data transfer and reducing the risk of errors.
- Create a Storyline - By visualizing the entire workflow in a storyline, you can identify potential bottlenecks, errors, or points of failure in advance. This allows you to implement error-handling mechanisms and ensure a smooth process.
- Integration Tools and Setup - Creating workflows within HubSpot necessitates an upgrade to a Marketing Hub Professional plan. It's crucial to ensure all your prerequisites are in order before proceeding to avoid misallocating time and resources. Understanding the integration limitations is equally vital, as it prepares you for what lies ahead when configuring your workflows.
- Field Mapping Requirements - Once you've identified the data to export, it's essential to accurately align it on both platforms. This might involve creating custom fields to ensure the data ends up in the correct location.
It's worth noting that when exporting fields beyond the contact name and email address, you'll need to take a slightly different approach in your workflow. Instead of the typical action to "register an attendee" for the event, your action should be "send a webhook." Think of a webhook like a digital courier who delivers messages. In this context, the message contains instructions for Accelevents to register the attendee and include the additional field information in their registration. It's a way to ensure all the necessary data reaches its destination accurately and efficiently.
- Testing and Quality Assurance - Testing allows you to identify and rectify any errors, glitches, or unexpected behavior in your workflow. This ensures that the workflow operates as intended when it's deployed to a live environment. Testing from the perspective of both event organizers and attendees ensures that the export process is user-friendly and aligns with your expectations. This is important for a positive event experience.
VI. Configuring HubSpot Workflows for Event Registration Imports
Using the Workflow Editor in HubSpot empowers you to design and orchestrate powerful automation sequences that can transform how you manage your event registration, marketing, sales, and more. This user-friendly tool allows you to visually create, customize, and execute workflows, all without needing to be a technical expert.
- Accessing the HubSpot Workflows tool
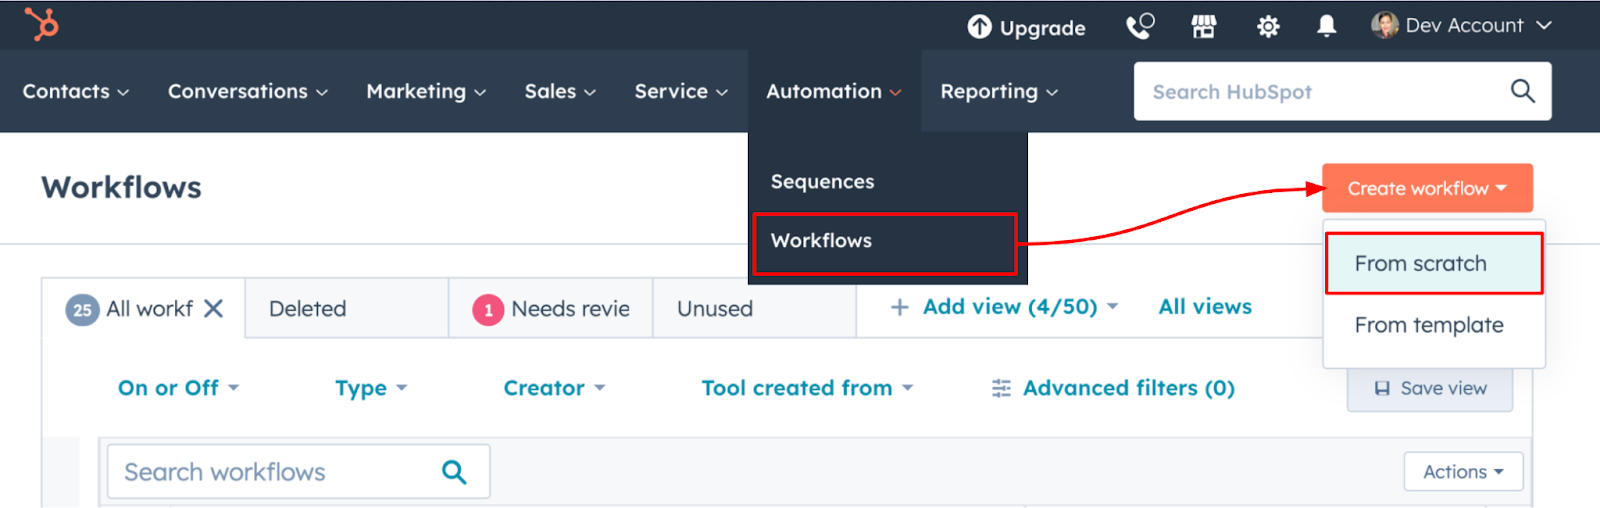
Once logged in to your HubSpot account, you should see an “Automation” tab in the top navigation bar. Click that and select “Workflows” to access the workflow dashboard. From the workflow dashboard, click “Create Workflow” and select “From Scratch.”
While HubSpot provides pre-designed workflow templates for various purposes, such as marketing, sales, and service, we recommend building an event registration workflow from the ground up. This approach allows you to tailor your workflow to your specific needs by customizing filters and gaining precise control over its content and functionality.
- Creating a new workflow for event registration imports
During the initial setup phase, you must specify the HubSpot object that your workflow will focus on. In this instance, the workflow will be contact-based since we are exporting contacts to Accelevents. And since we’re doing everything from scratch, select the option to create a blank workflow.

Once you get to the Workflow Editor, give your workflow a name and a description to help you and your team understand its purpose and function.
Here's where the magic of the workflow unfolds! If you've already figured out what you want to happen, this is where you bring that plan to life. In this example, let’s make a simple storyline - register contacts as event attendees.
At the very least, you'll need to specify in the workflow which HubSpot contacts will be signed up, what contact details should be included for the event, which particular event they are registering for, and which event ticket they should receive.
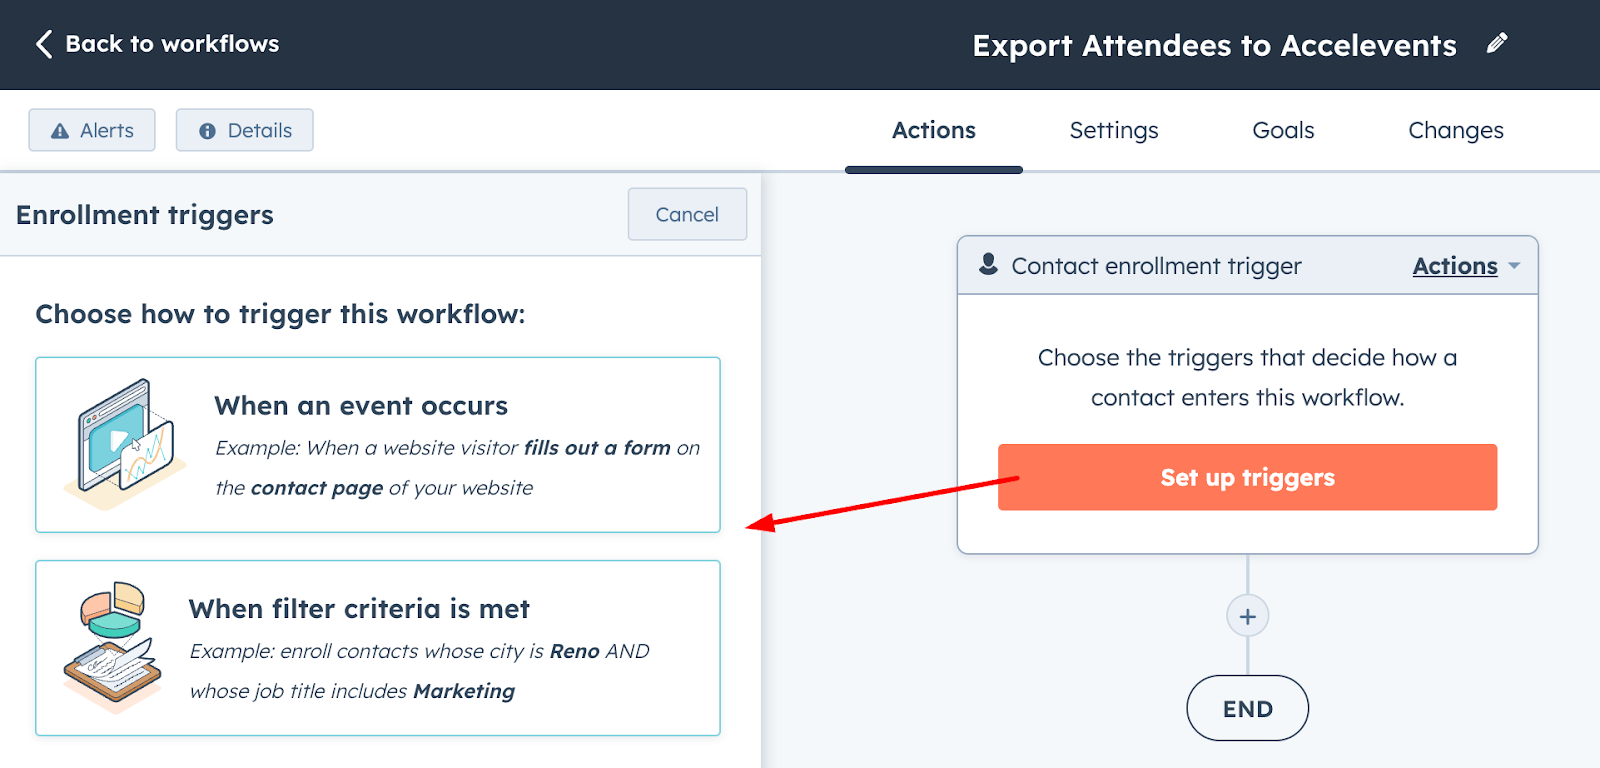
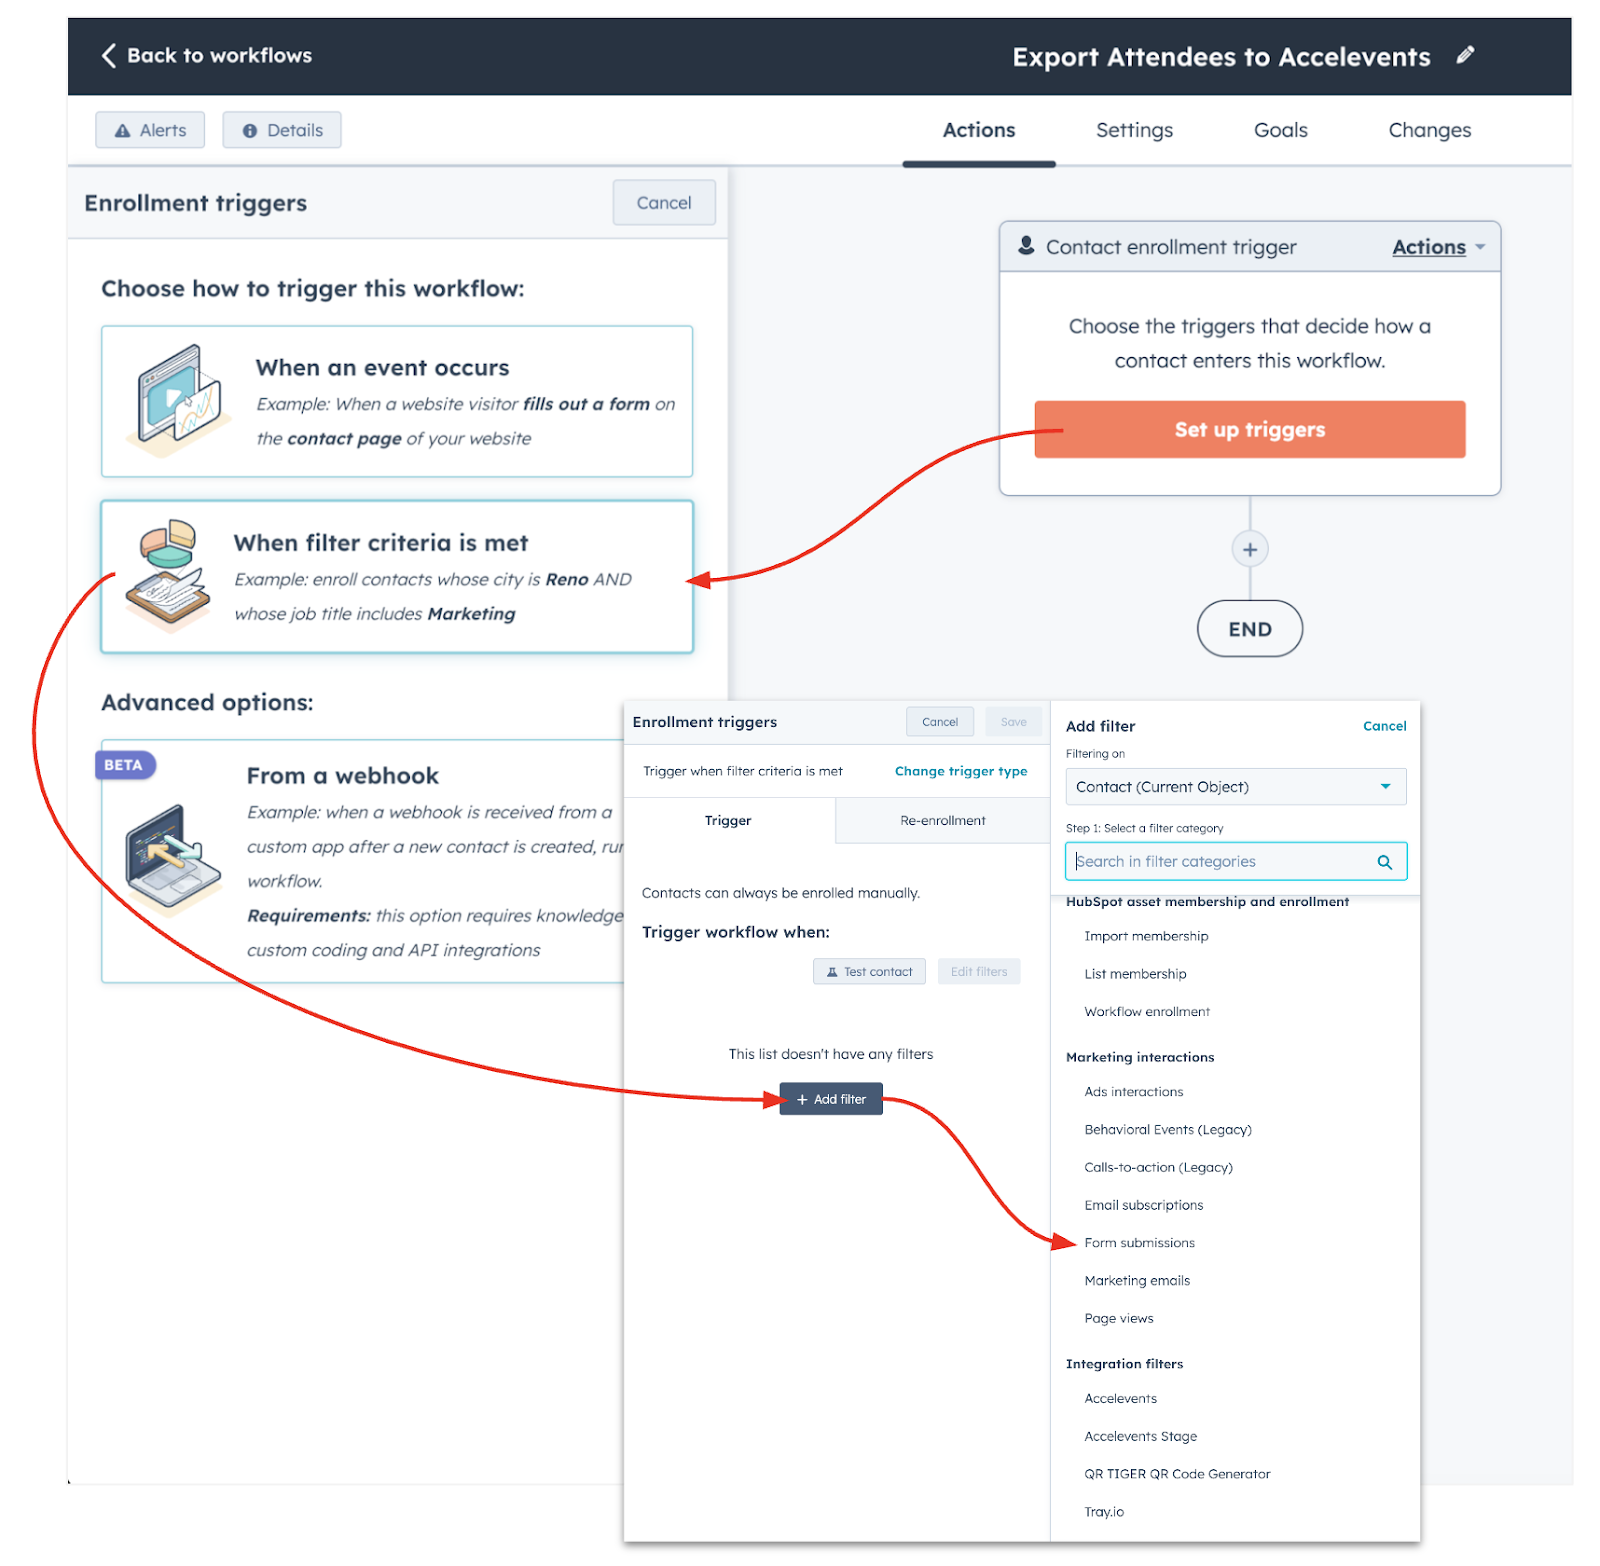
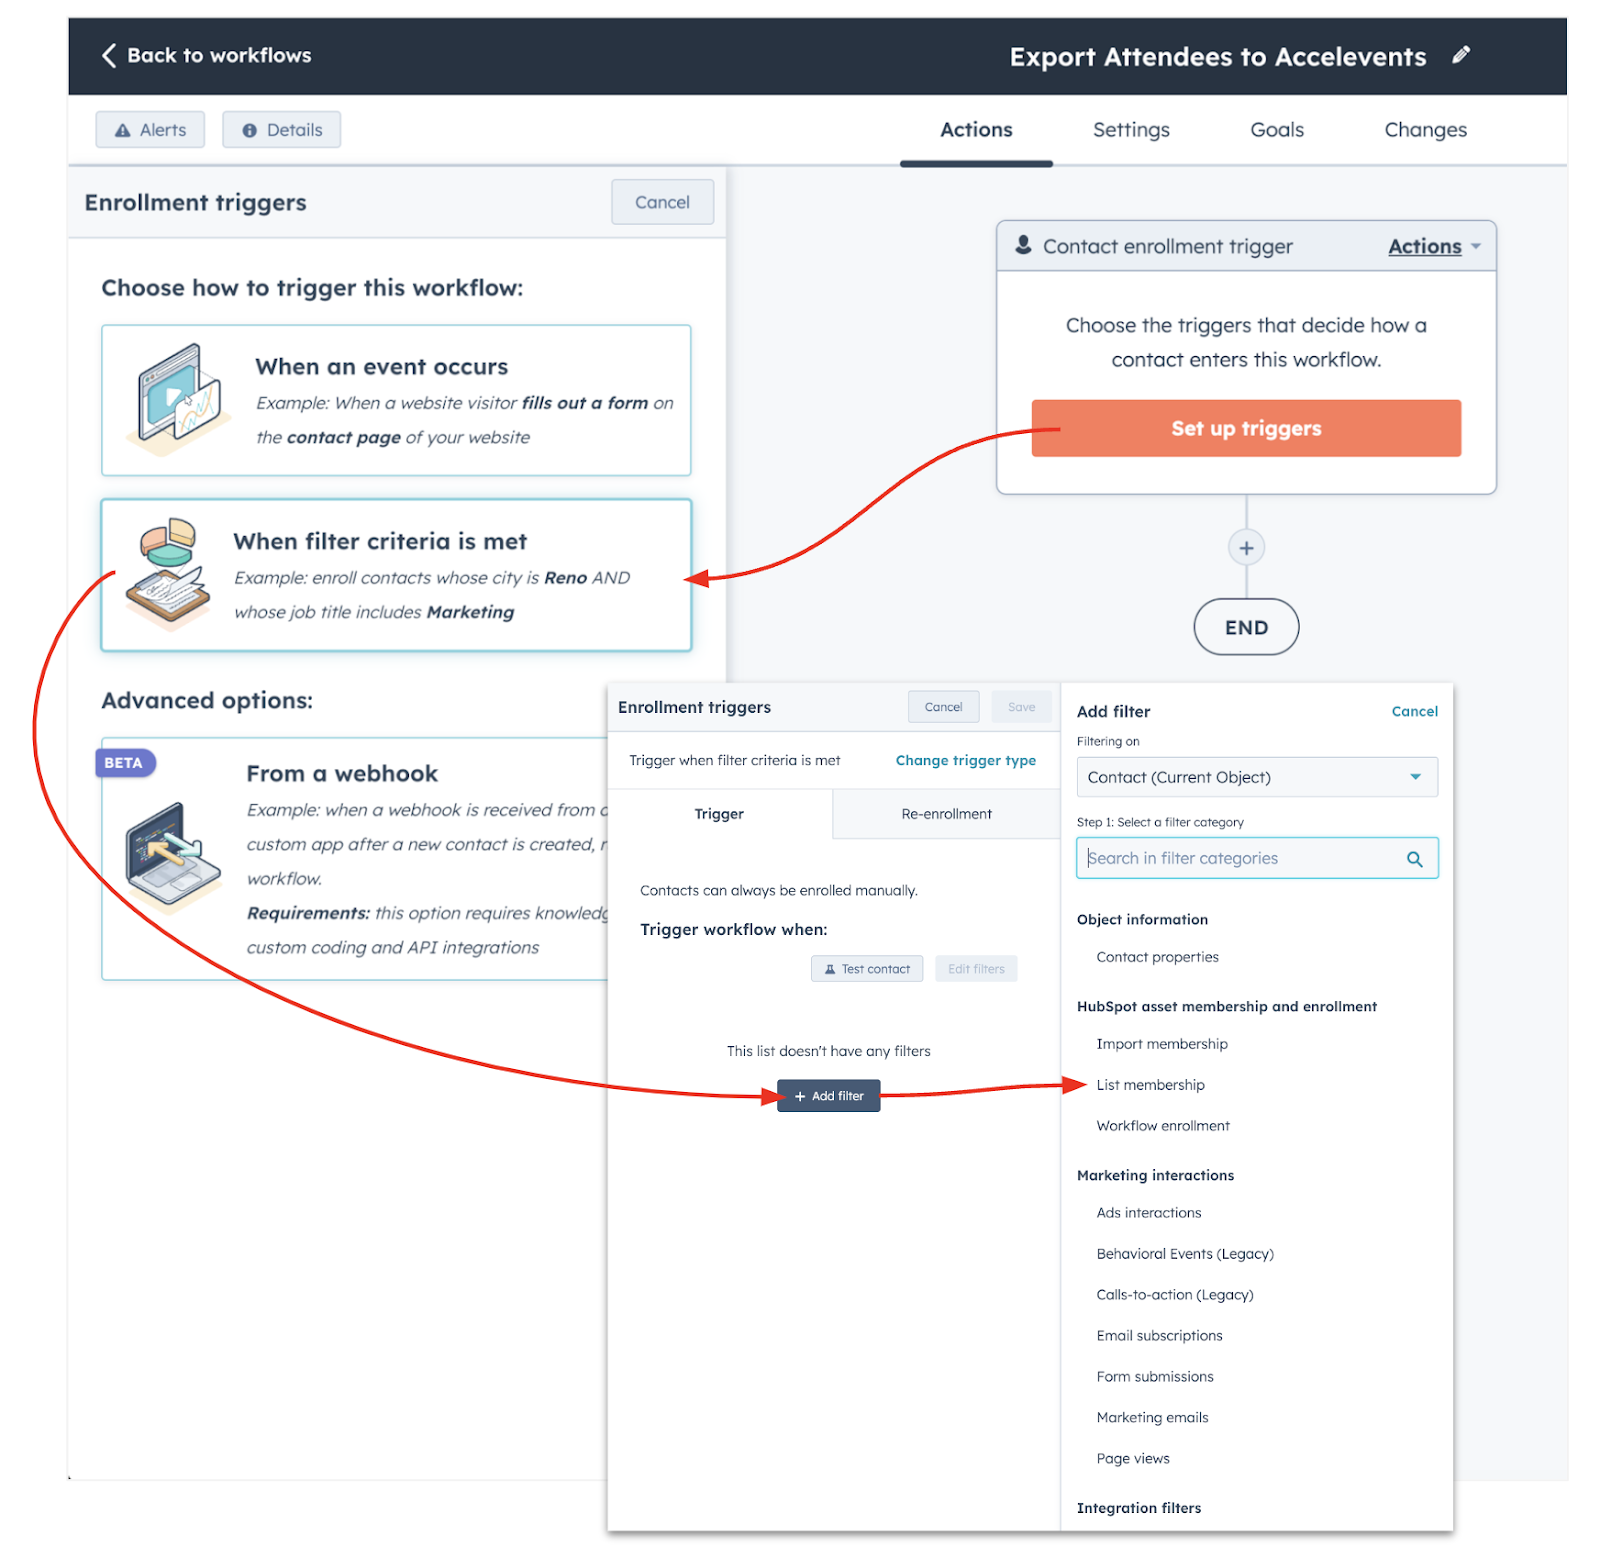
- Setting up enrollment triggers
Enrollment triggers in a workflow are like the starting point or the "key" that decides who will be included in the automated process. Think of them as the conditions that open the door for someone to be part of that workflow. Here's where you determine which HubSpot contacts will be signed up for the event, and there are various methods to do so. You can select contacts from a specific list, those who have submitted a form, or contacts with specific details in their records, among other options.
- Setting up workflow actions
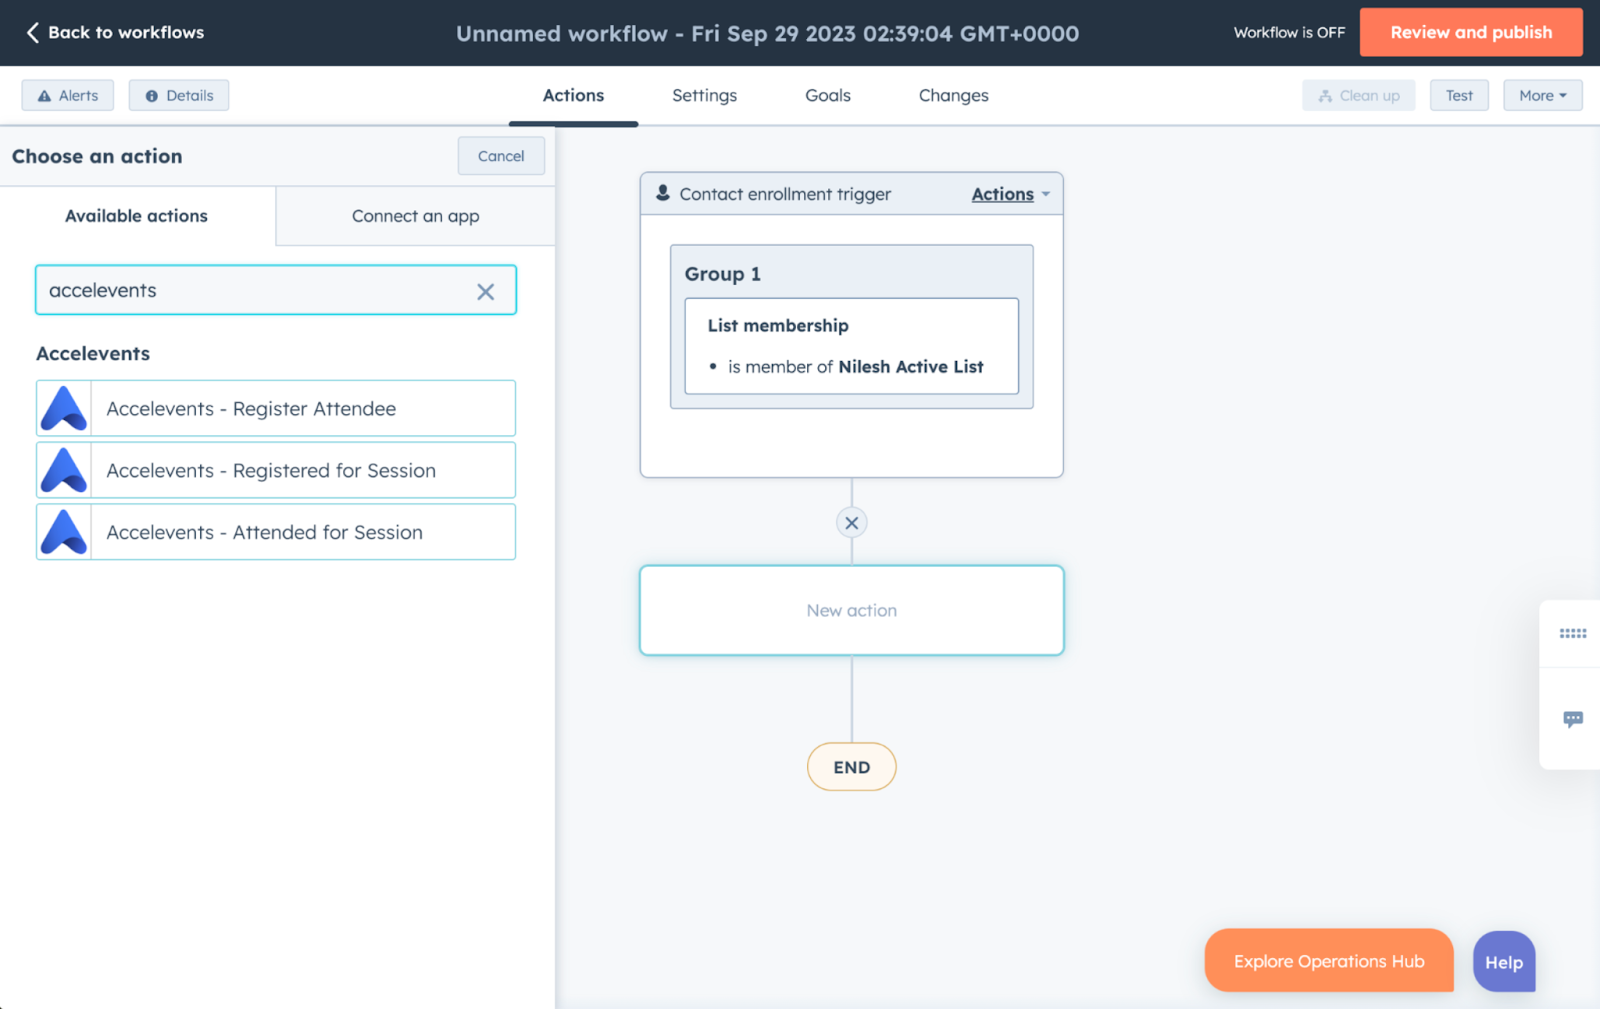
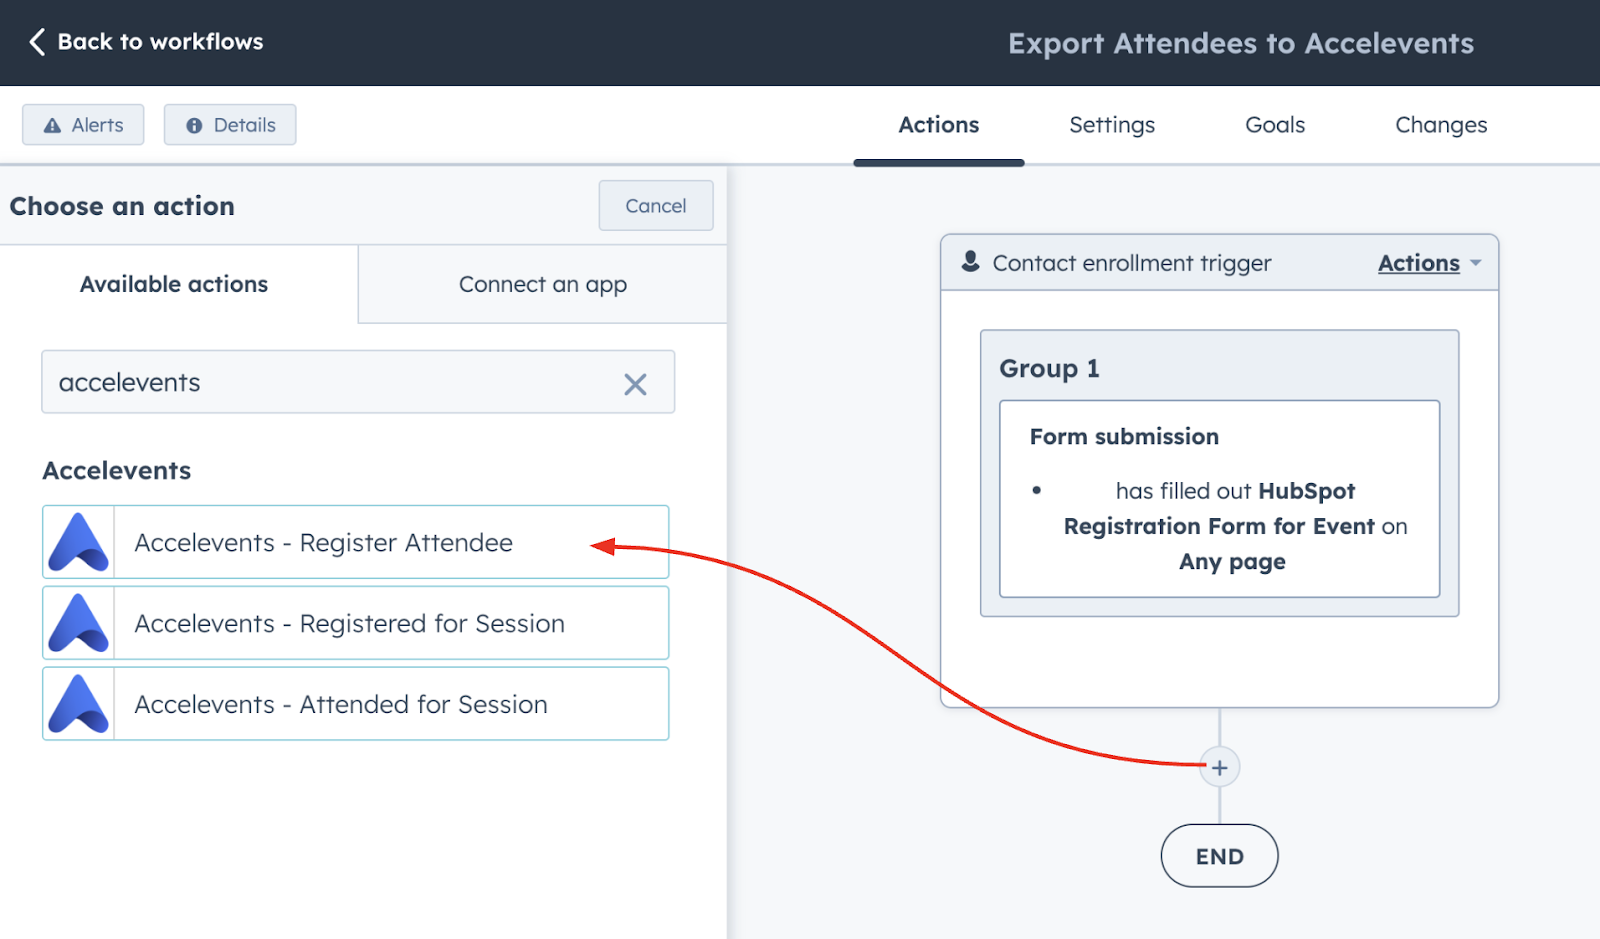
Once you've set up your enrollment triggers, proceed by clicking the "add" (+) button within the workflow editor to add actions. This is where you instruct the workflow on what to do when someone is enrolled in the workflow. If your Accelevents integration is enabled, you'll find Accelevents-related actions in the menu. Select "Accelevents - Register Attendee."

Within this action, you can specify the event and ticket type to assign to the attendee. It's worth noting that certain fields for export are predefined; only the contact's first name, last name, and email address will be included in the attendee's event registration. In the later part of this article, we'll explore additional workflow actions that allow you to include other mapped fields.
- Publishing the workflow
Before you make your workflow live, it's crucial to test it thoroughly to ensure it works as expected. When you're confident and ready to launch, simply click the "Publish" button. You'll then have the option to enroll existing contacts that currently meet the criteria or apply it only to contacts that meet the criteria after activating the workflow. Once you've decided, click "Turn On," and your workflow will start working its magic.
VII. Recommended Workflows
When importing contacts from HubSpot to Accelevents, two essential items have to be known aside from the contact’s basic information - the event where they should be added and what ticket type to assign them. In the following workflow examples, you'll have the option to either choose these values directly within the workflow or add them to the contact's record. Having a clear understanding of your needs and desired outcomes will guide you in selecting the most suitable workflow, which you can further customize to align with your specific requirements.
- Form Submission Workflow
This workflow is ideal for the scenario where attendees register for the event through a HubSpot form.
- Someone submits a HubSpot form.
- The first name, last name, and email address of the submitter are automatically transferred to Accelevents.
- The submitter is then provided with a ticket for the corresponding event in Accelevents.
To set this up, you'll begin with the enrollment trigger. Select "Form Submission" and specify the particular HubSpot form you want to use. Ensure that the form captures the first name, last name, and email address fields.
Next, set up the action by choosing "Accelevents - Register Attendee." Within this action, you can define the event and select the ticket type for the attendee.
If your objective aligns with this straightforward process, you're ready to go after publishing the workflow. You have the option to incorporate more triggers if necessary or select a different action if you wish to include additional mapped fields in the export. We’ll discuss more about mapping other fields to the export later in another workflow.
- List Membership Workflow
If you already have your event attendees stored in your HubSpot account, this workflow is designed to help you export them to Accelevents seamlessly. You can start by organizing your contacts by adding them to a specific list in HubSpot. The goal of this workflow is to enroll all the members of that list so that they can be registered for the event. Think of it as your storyline: "If they are on the list, add them as attendees."
To set the workflow, start with the trigger. Choose "List Membership" and specify the name of the list you've created. This means that anyone who is a member of that list will be automatically enrolled in the workflow.
Next, select the action: "Accelevents - Register Attendee." Within this action, you'll specify the event and ticket type for these attendees.
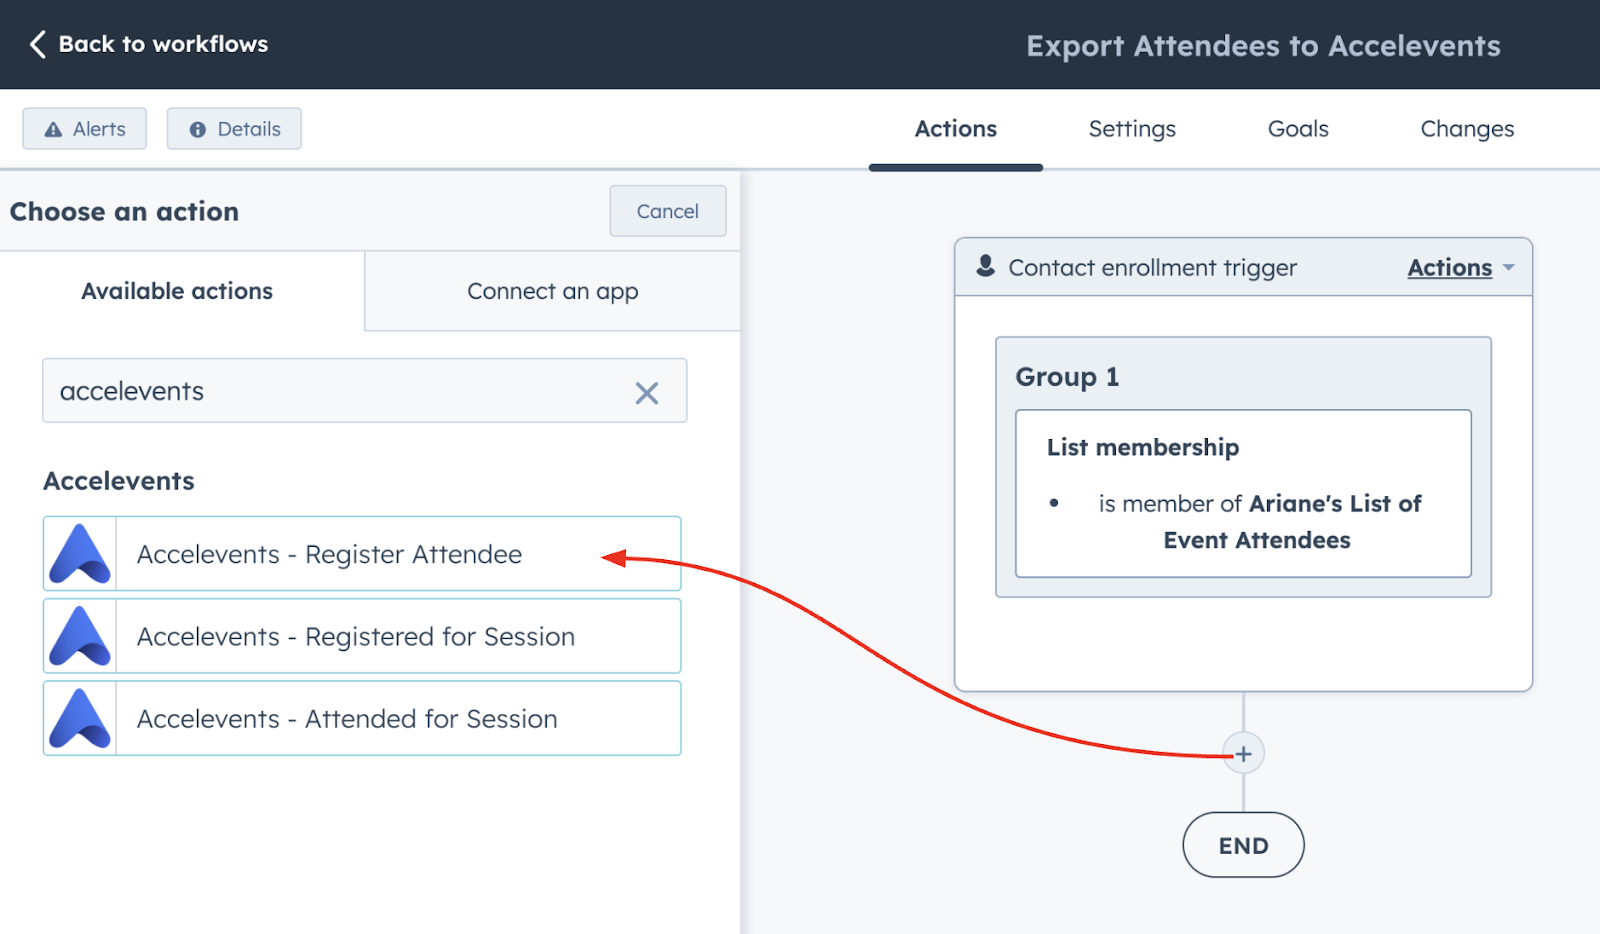
Once you publish this workflow, all the list members will receive their respective event tickets. Similar to the form submission workflow, only the contact's name and email address will be pushed to Accelevents.
This workflow is straightforward, and you have the flexibility to customize it if you wish to add more filters to precisely define which list members should be exported. If your goal is to export more than just their basic information, the next workflow may better suit your needs.
- Webhook Workflow
In the previous two workflows we discussed, we used the same action, "Accelevents - Register Attendee," which limited us to registering the attendee for the event and exporting only their name and email address. However, this might be restrictive if you've gathered more details from your attendees, such as their phone number, job title, company, or dietary preferences.
To ensure that all these additional mapped fields are exported to Accelevents, we're introducing a different action in this third workflow: "Send a Webhook." As we mentioned earlier in this article, a webhook is like a messenger that delivers the mail. In this particular webhook, the message to Accelevents is not only to register the attendee for the event but also to include all the other mapped fields in the export, beyond just the name and email address.
This is the only workflow action that allows you to incorporate all the other mapped fields. So if this aligns with your requirements, you can easily replace the action with "Send a Webhook" on your existing workflows to achieve your goals.
Contact Field Mapping
Before you start creating your workflow, you’ll need to ensure that all the fields you want to export are properly mapped in Accelevents. Go to Settings > Integrations of your event admin console, then click Configure next to HubSpot. From there select the corresponding matching fields under the Contact Field Mapping menu.

Accelevents Values
Once that’s set up, there are three crucial pieces of information you'll need from Accelevents to make use of the "Send a Webhook" action
- Webhook URL: This serves as the destination where data is sent when a specific trigger event occurs in your workflow.
- Event API Key: This key must be included in the contact record to determine which event they will be registered for.
- Ticket Type Number: This number should also be present in the contact record to determine the type of ticket to assign to each attendee.
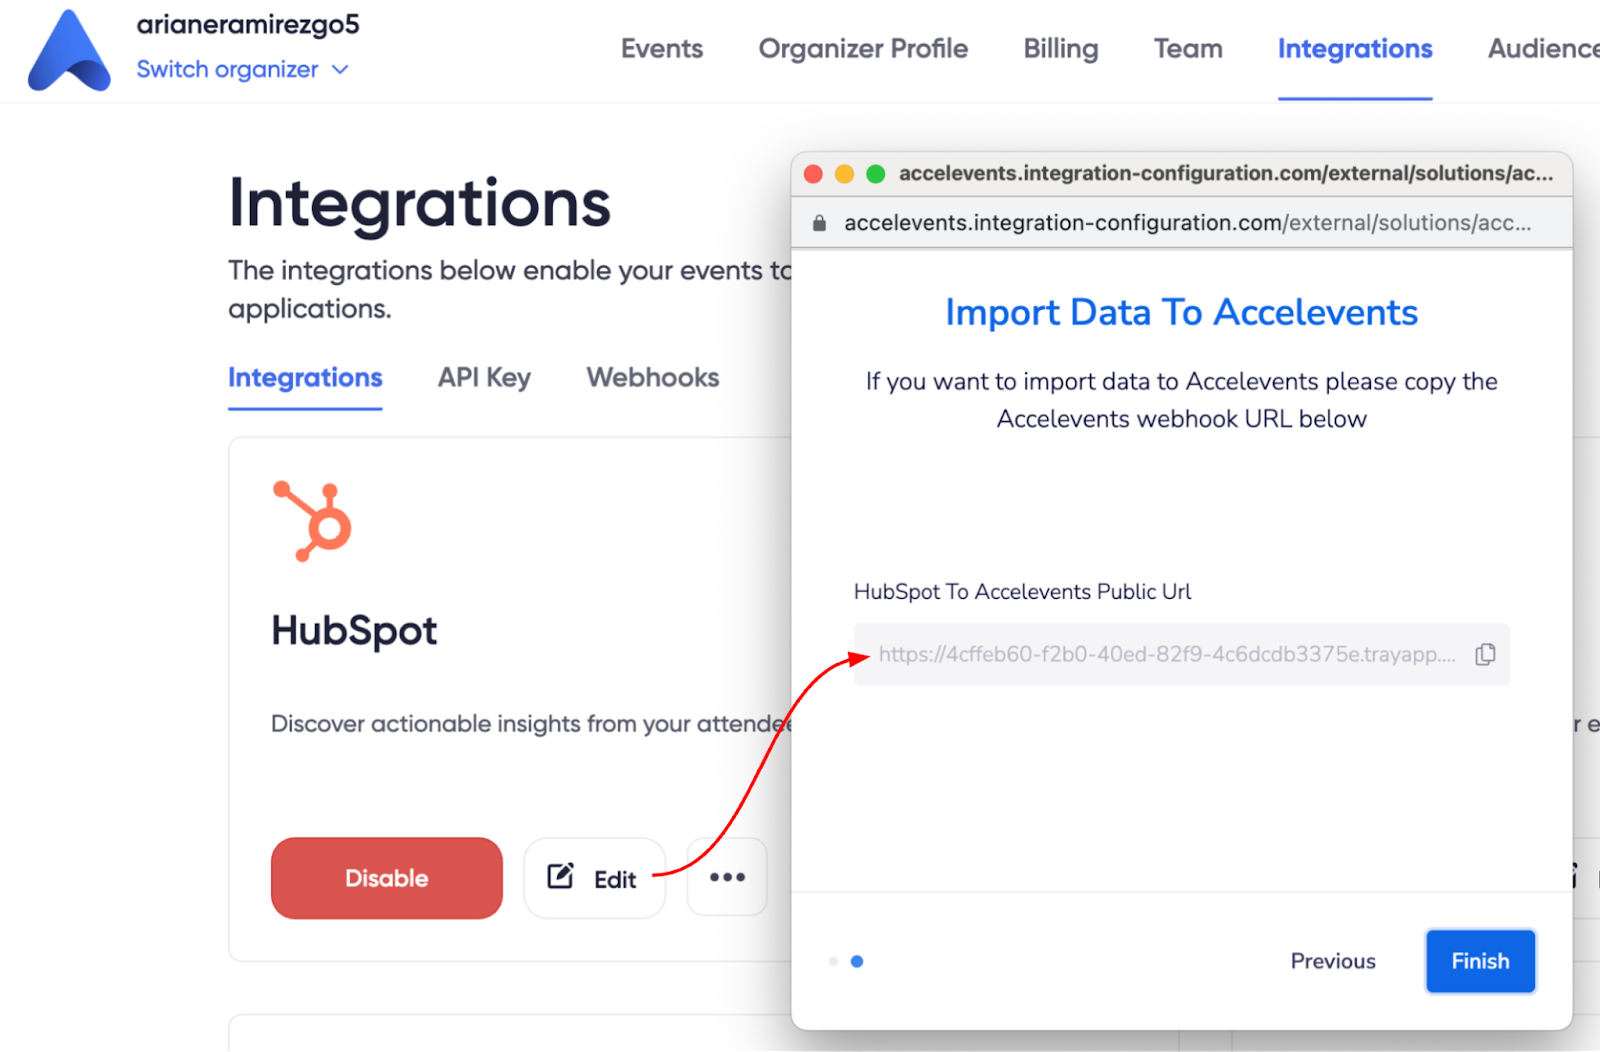
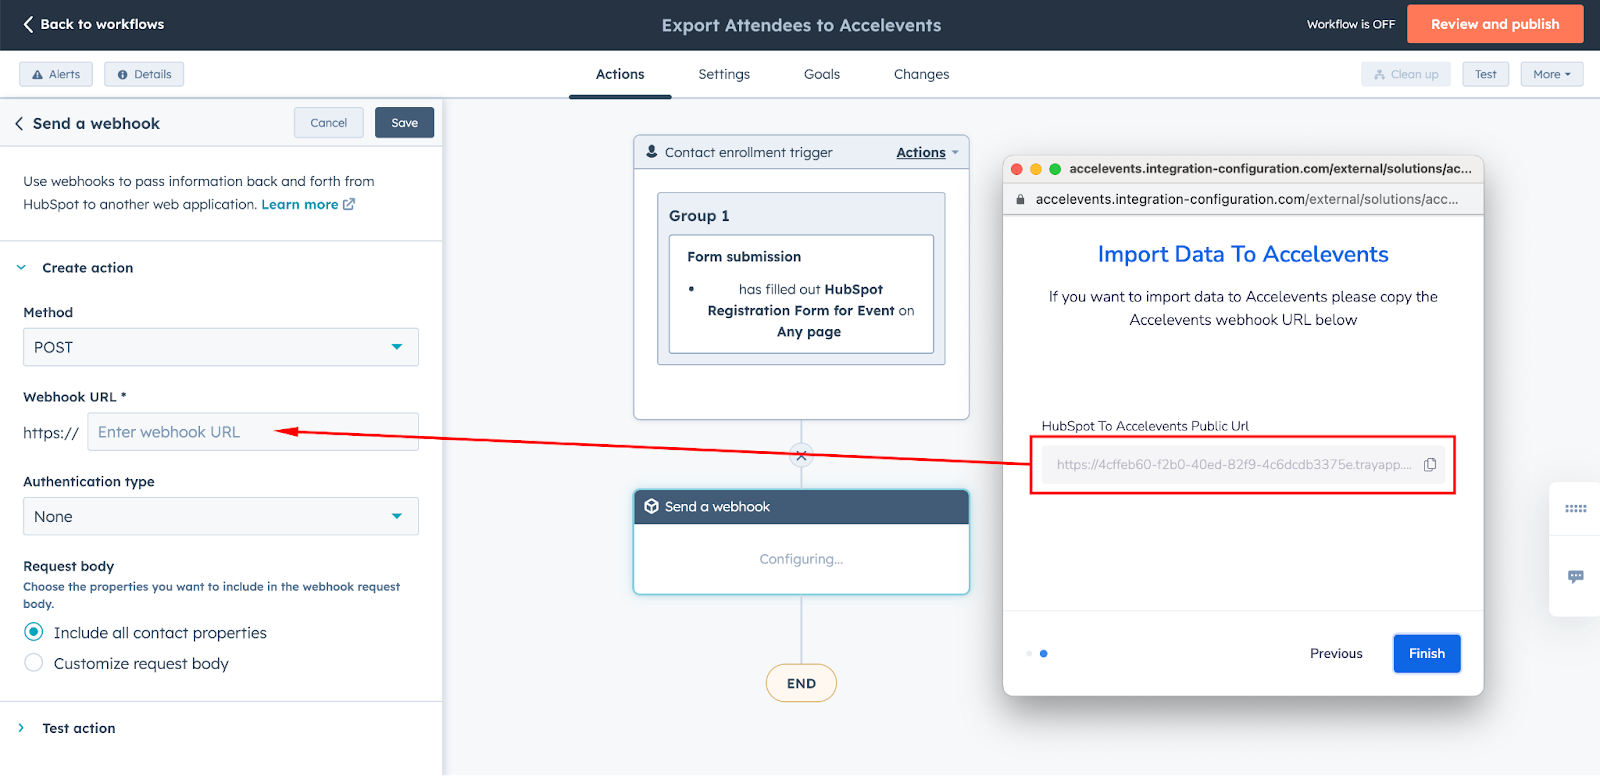
To retrieve the Webhook URL, go to the Accelevents Organizer Portal's HubSpot Integrations settings and click the "Edit" button. The URL should appear in the pop-up window.
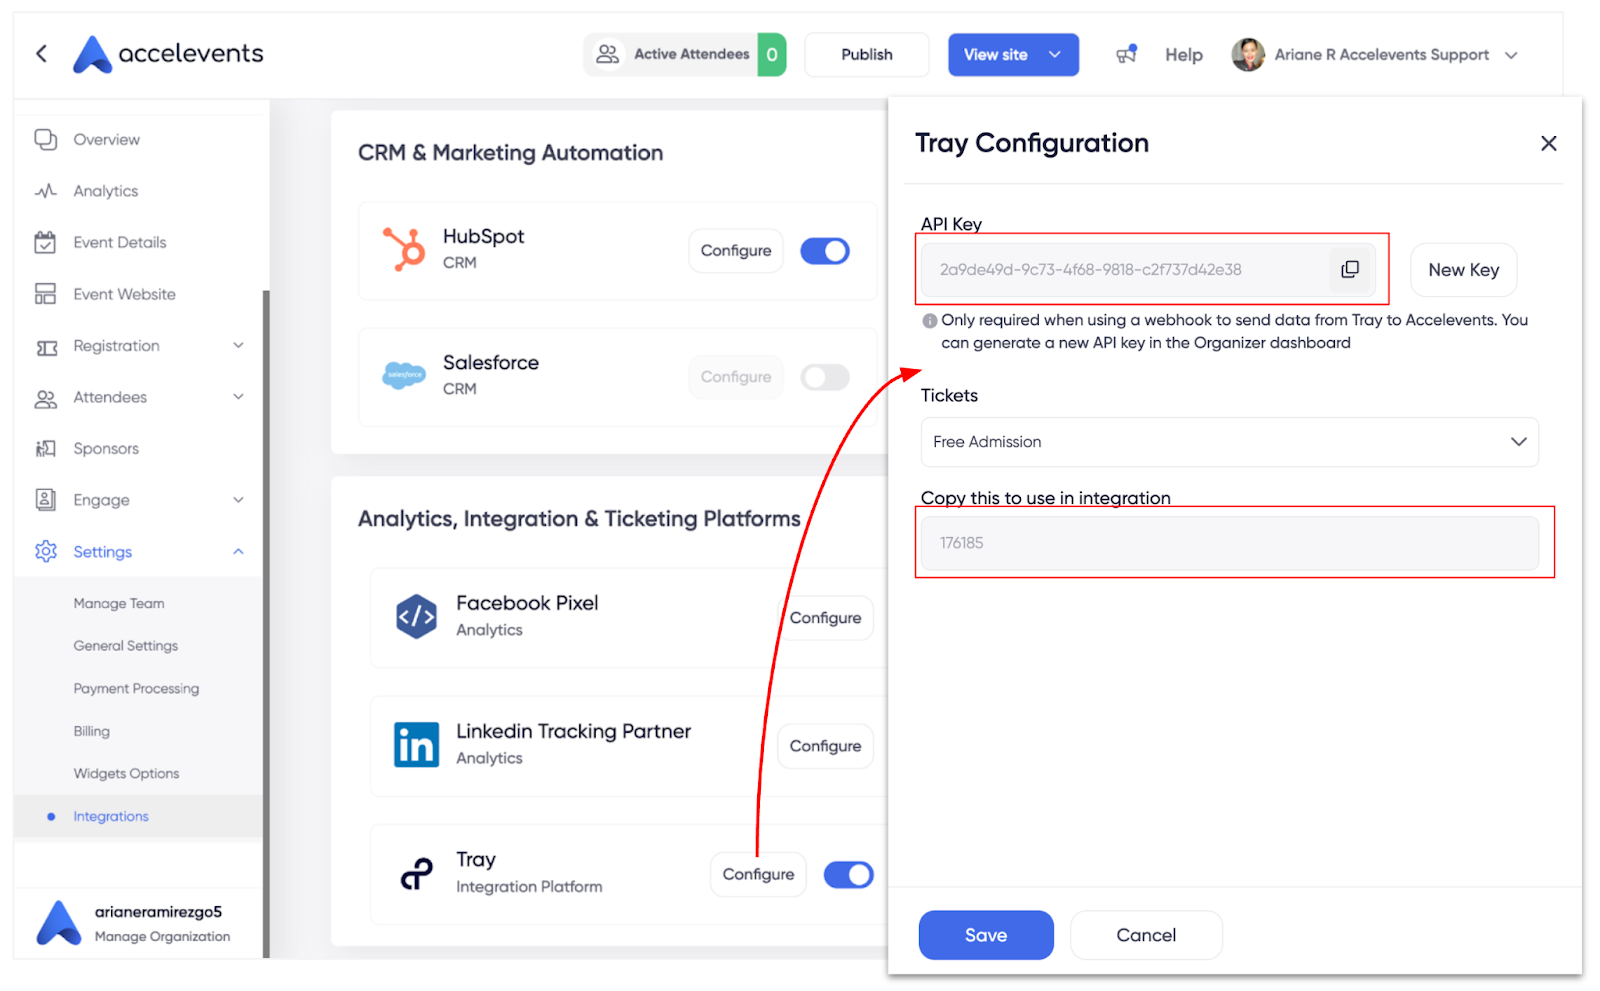
For the Event API Key and Ticket Type Number, you can locate them in the event's admin console, specifically within the Settings > Integration section. Turn on the Tray Integration Platform toggle, then click "Configure." In the Tray Configuration menu, copy the event API key. To find the Ticket Type Number, select the ticket name from the drop-down menu and copy the number that corresponds to it.
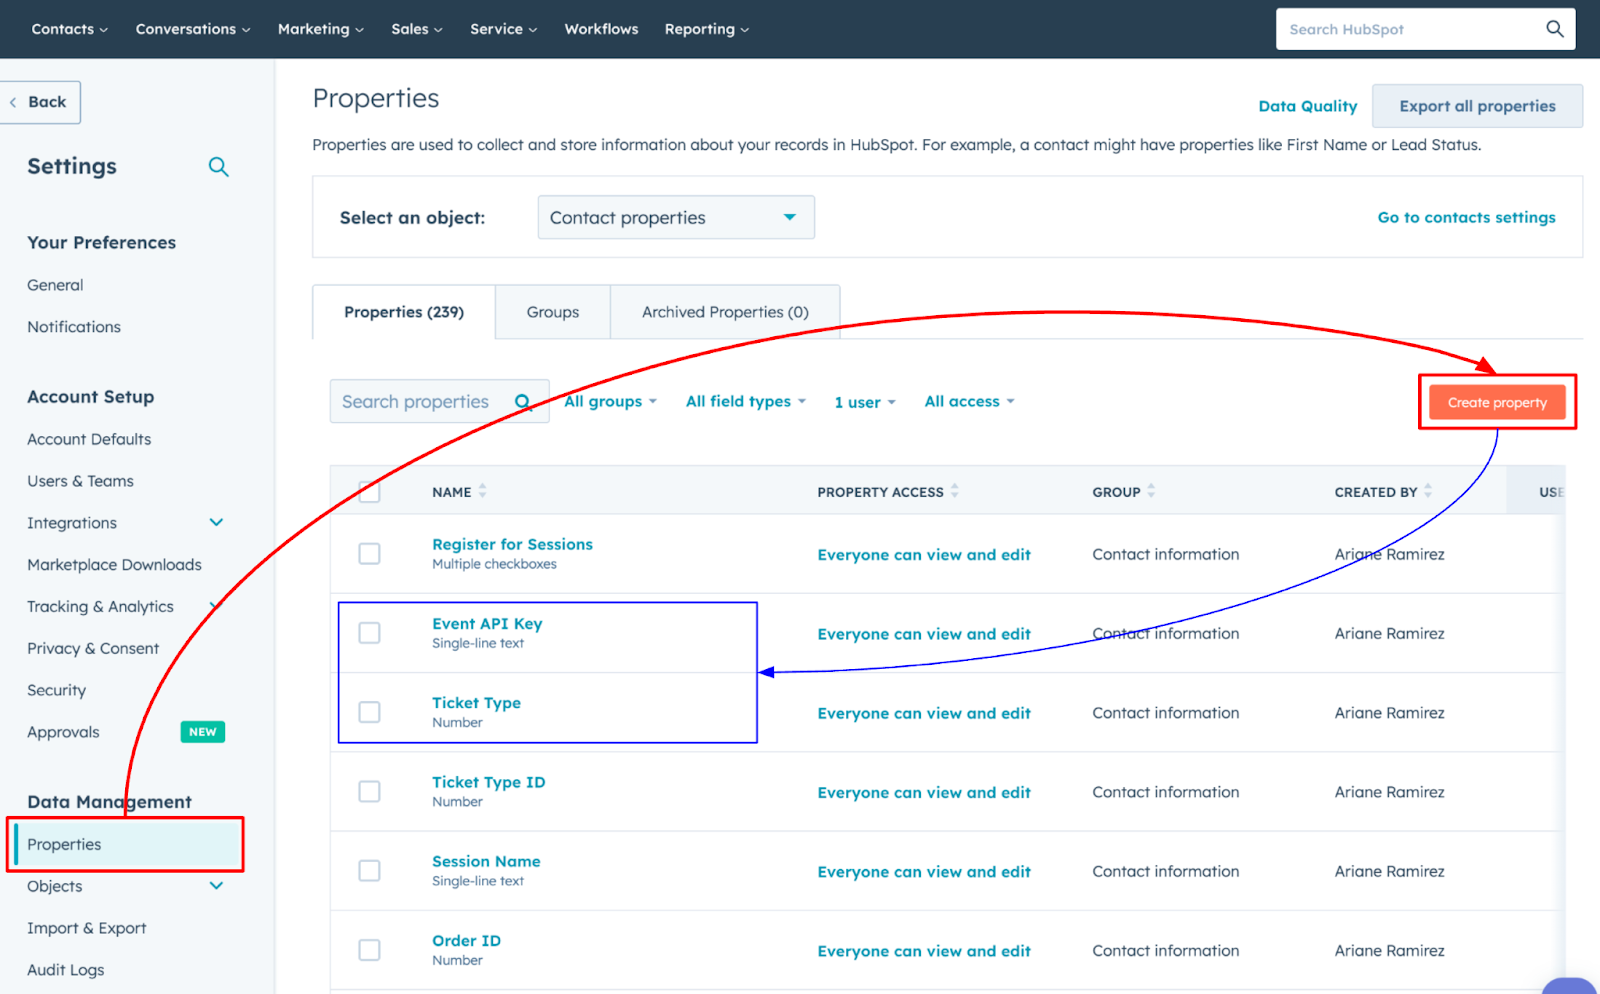
HubSpot Contact Field Creation
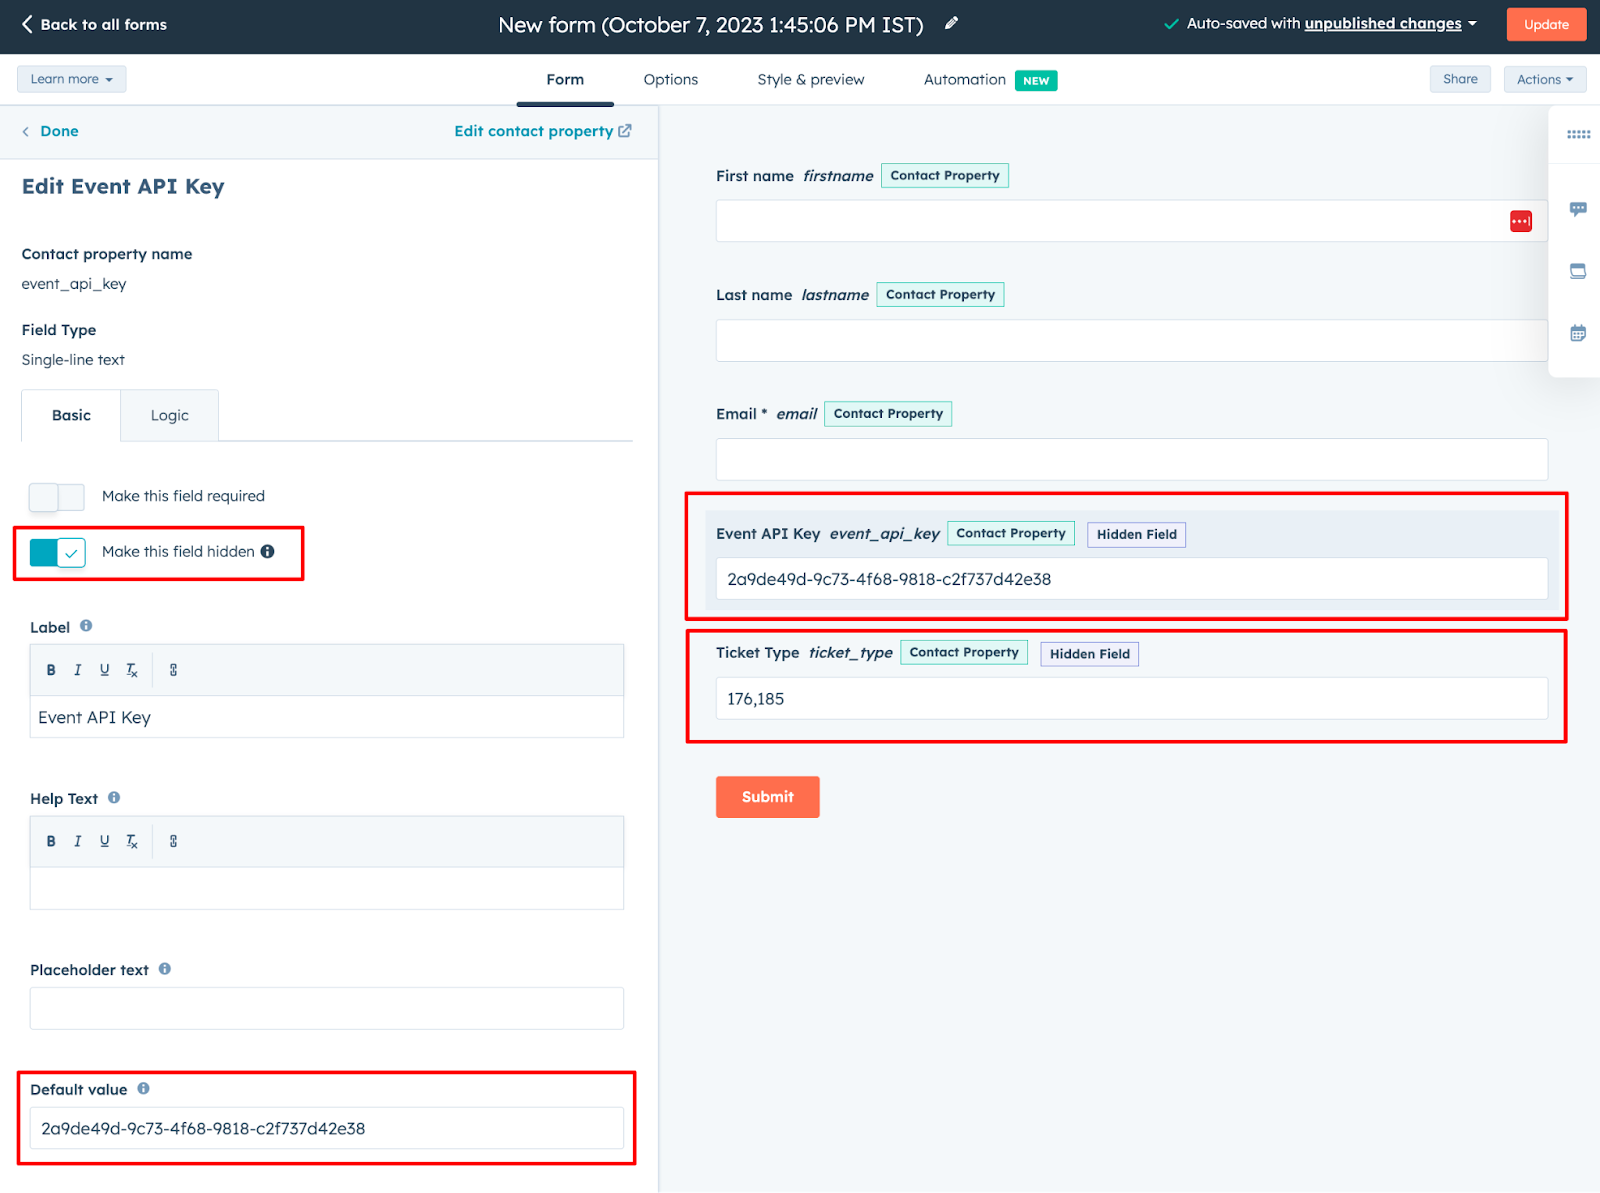
Furthermore, you'll need to create two new contact properties in HubSpot. These properties will determine the event and ticket to be assigned to each attendee:

You will need to add the API key and ticket type number you obtained from Accelevents as values to these fields for each contact that needs to be registered for the event. Since it’s a tedious job to paste that in each contact record, you can create a separate workflow that automatically populates this information in the contact record.
If you’re using a HubSpot form for attendee registration, you can include those two fields in the form as hidden fields with pre-defined values. This way, when contact records are created, the field values will be populated automatically.
The key point to remember is that for the webhook action to function correctly, the API key and ticket type number values must be present in the contact record to ensure successful export to Accelevents.
Workflow Trigger
Now that you have the necessary data, the next step is to craft the storyline that will guide the workflow's execution. In this example, our objective is to automatically register anyone who signs up through the HubSpot form for the event, similar to our Form Submission Workflow. However, in addition to capturing their name and email, we aim to include all other mapped fields in their event registration. In this scenario, it's worth noting that we've already incorporated hidden fields for Event API Key and Ticket Type in the form.
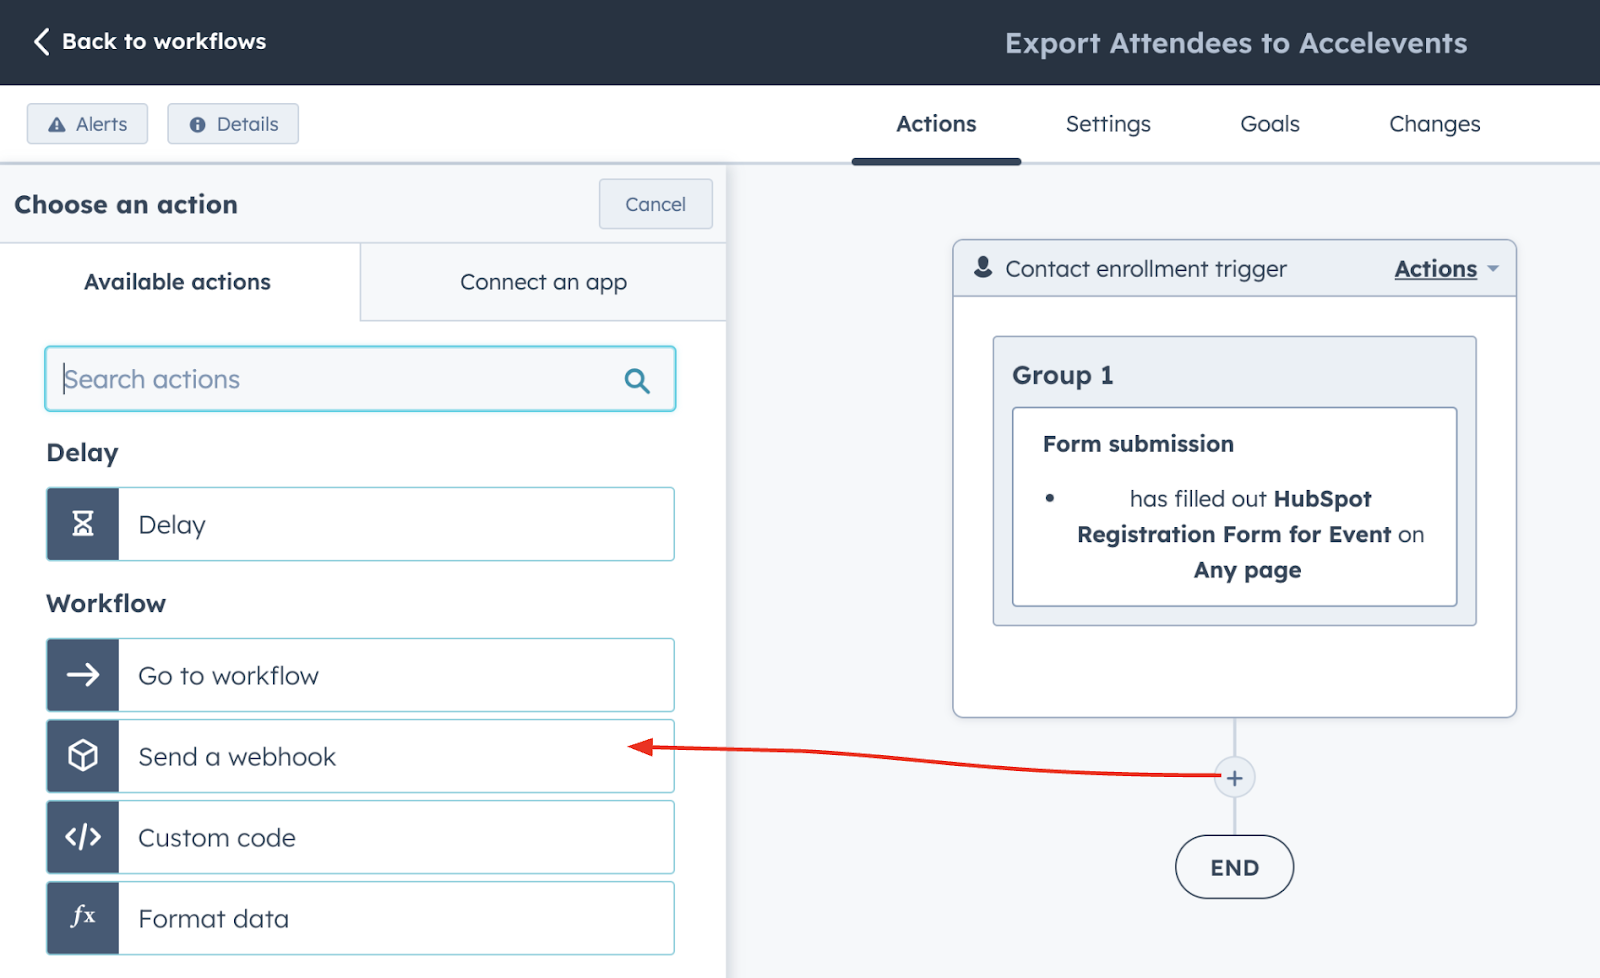
To start creating the workflow, you can begin with a "Form Submission" trigger, just as we did in our initial workflow. Within the same trigger flow, click the "add filter" button under "AND." Then, select "Contact Properties" from the trigger options, and locate the Event API Key field. In the filter settings, choose "is known." This trigger effectively includes anyone who completes the form with the Event API Key and Ticket Type fields filled out.
Workflow Action
For the action, select “Send a Webhook.” Within the setup menu, choose "Post" under the Method. Then, paste the webhook URL you obtained from Accelevents. Ensure that the option "Include all contact properties" is selected to guarantee that all the mapped fields are included in the export.
Once this workflow is activated, attendees will not only be registered for the event but also all the additional contact information you defined in the mapping within Accelevents will be seamlessly transferred.
By carefully configuring enrollment triggers and actions, you can seamlessly transfer data. Whether you're looking to transfer basic contact information or include a wide range of mapped fields, HubSpot’s workflow customization options provide the flexibility to meet your specific needs. By integrating multiple workflows, you can harness the full power of HubSpot's automation capabilities to ensure a seamless and data-rich transfer of information.
VIII. Conclusion
This comprehensive guide has hopefully shed light on the integration between Accelevents and HubSpot workflows, offering event organizers a streamlined and efficient solution for managing event registrations. By integrating these two platforms, you can automate processes, improve communication, and gain valuable insights into your attendees.
Whether you're hosting virtual, in-person or hybrid events, this integration workflow empowers you to create streamlined attendee experiences while saving time and effort. As technology continues to advance, staying ahead of the curve with innovative tools like Accelevents and HubSpot will undoubtedly enhance your event management capabilities.


